Saturday, November 28, 2009

Silverlight 4 - Drag and drop images on a Silverlight application

One of the great new features of Silverlight 4 is drag-drop. This makes it possible to drag files from your OS onto the Silverlight application.


In this tutorial we’ll create a ListBox and make it possible to drop images from the desktop onto the application. The images will then appear in the ListBox.


First steps

First of all we’ll create a “normal” Silverlight 4 App + Website using Visual Studio 2010 or Expression Blend.

Next we need a ListBox to show the images when they are dropped on it. Make sure your XAML looks similar to this:

<UserControl x:Class="DragDrop.MainPage"
xmlns
="http://schemas.microsoft.com/winfx/2006/xaml/presentation"
xmlns:x
="http://schemas.microsoft.com/winfx/2006/xaml"
xmlns:d
="http://schemas.microsoft.com/expression/blend/2008"
xmlns:mc
="http://schemas.openxmlformats.org/markup-compatibility/2006"
mc:Ignorable
="d"
d:DesignHeight
="328" d:DesignWidth="514">

<Grid x:Name="LayoutRoot" Background="White">
<ListBox Height="Auto" HorizontalAlignment="Left" Name="listBox1" VerticalAlignment="Stretch" Width="200" />
</Grid>
</UserControl>


Hooking it up


Next step is to create an eventhandler for the drop event. But first we need to make sure that it is allowed to drop objects onto the ListBox.


This is done by setting the AllowDrop property of the ListBox to true.


So with the addition of that line your code should look similar to this:


public MainPage()
{
InitializeComponent();
listBox1.AllowDrop
= true;
listBox1.Drop
+= new DragEventHandler(listBox1_Drop);
}

void listBox1_Drop(object sender, DragEventArgs e)
{
throw new NotImplementedException();
}


Getting the file(s) from the DragEventArgs


Now that we have everything hooked up it is time to get started with the real stuff :)


At this time Silverlight 4 beta only has one so called DataFormat available. With this DataForm we can retrieve the file(s) dropped onto out ListBox:


System.IO.FileInfo[] fileInfos = e.Data.GetData(DataFormats.FileDrop) as System.IO.FileInfo[];
foreach (FileInfo fileInfo in fileInfos)
{

}


The code above goes in the listbox1_Drop eventhandler.


Helper methods


All that is left is to add the images that were dropped to the ListBox. Before Creating the Image objects we need to make sure that the files are indeed images. All we can do to check this is to check the extension of the file.

The following method can be used to check the files:


private bool IsImageFile(string p)
{
switch (p.ToLower())
{
case ".jpg":
case ".png":
return true;
default:
break;
}
return false;
}


Now that we are pretty certain the files are images, we can create Image objects out of them. For this functionality we can use the following method:


private Image CreateImageFromFile(System.IO.FileInfo fileInfo)
{
using (FileStream fileStream = fileInfo.OpenRead())
{
BitmapImage bitmap
= new BitmapImage();
bitmap.SetSource(fileStream);
Image image
= new Image();
image.Source
= bitmap;
image.Width
= 50;
image.Stretch
= Stretch.Uniform;
return image;
}
}


Wrapping it up


Now all that is left for us to do is put the things together we created in the previous section.


In the foreach loop we created before, we’ll check if the files are images and if true, add them to the ListBox:


if (IsImageFile(fileInfo.Extension))
{
listBox1.Items.Add(CreateImageFromFile(fileInfo));
}


The entire code-behind should look something like this:


public partial class MainPage : UserControl
{
public MainPage()
{
InitializeComponent();
listBox1.AllowDrop
= true;
listBox1.Drop
+= new DragEventHandler(listBox1_Drop);
}

void listBox1_Drop(object sender, DragEventArgs e)
{
System.IO.FileInfo[] fileInfos
= e.Data.GetData(DataFormats.FileDrop) as System.IO.FileInfo[];
foreach (FileInfo fileInfo in fileInfos)
{
if (IsImageFile(fileInfo.Extension))
{
listBox1.Items.Add(CreateImageFromFile(fileInfo));
}
}
}

private Image CreateImageFromFile(System.IO.FileInfo fileInfo)
{
using (FileStream fileStream = fileInfo.OpenRead())
{
BitmapImage bitmap
= new BitmapImage();
bitmap.SetSource(fileStream);
Image image
= new Image();
image.Source
= bitmap;
image.Width
= 50;
image.Stretch
= Stretch.Uniform;
return image;
}
}

private bool IsImageFile(string p)
{
switch (p.ToLower())
{
case ".jpg":
case ".png":
return true;
default:
break;
}
return false;
}
}


That’s it!


You can download the source here


Don’t forget to subscribe on the homepage of this site so we can keep you posted! And there’s a feed available for blogposts and news as well, so subscribe to that as well if you’re interested!

Thursday, November 19, 2009

Silverlight 4 – Using the webcam

Yesterday the beta release of Silverlight 4 was announced. Of course I couldn’t resist to get started with one of the items on my personal wish list (and on lots of other peoples wish list as well).


Using the webcam in Silverlight 4 turned out to be a quite easy process. I only needed about 8 lines to get it started. A few lines more and I have an application which starts and stops the webcam with the click of a button.


Create the controls

First thing I did was create the controls in xaml using the new designer in Visual Studio 2010. I created a Grid to show the video in (I’ll explain later on why I used a Grid instead of the expected MediaElement) and a button for starting and stopping it.


Huh?! No Stream?

As I mentioned before we’ll be using a Grid to display the video in. Why wouldn’t you use a MediaElement? The reason for that is that, as far as I have found out until now, no Stream output for the videocapturing devices available.

This probably has something to do with the difficulty to control the videocapturing devices and with the different formats of the streams. Note that this isn’t based on anything, it’s just my assumption.

What is available then? Good question. It took me a while to figure out, so finally I gave up and goo.. euhm binged for the webcam support in Silverlight 4 and came up with an article describing how to get the video from the capturing device.


The code

First we need a field to save the CaptureSource in and we need to hook up the Click event of the button:

private CaptureSource _cs = new CaptureSource(); 

public MainPage()
{
InitializeComponent();
myButton.Click
+= new RoutedEventHandler(myButton_Click);
}


Next we will dive into the code required for getting the video from the capturing device.


Before we’re able to show the video from the CaptureSource we need to do some checks and verfications.


First of all, we’re going to check if the state of the CaptureSource is stopped. It would cause an exception if we would start it when it is already started.


if (_cs.State == CaptureState.Stopped)if (_cs.State == CaptureState.Stopped)


Next we’ll need to check if the user has granted us permission to use the webcam. We can do this by using the CaptureDeviceConfiguration class as follows:


if (!CaptureDeviceConfiguration.AllowedDeviceAccess) 
{
CaptureDeviceConfiguration.RequestDeviceAccess();
}


So what will happen here is that the Silverlight plug-in will show a pop-up with the question if you want allow camera and microphone access:


image


If the user responds with “Yes” we’ll continue to the next step. The code for this is:


if (!CaptureDeviceConfiguration.AllowedDeviceAccess) 
{
CaptureDeviceConfiguration.RequestDeviceAccess();
}
if (CaptureDeviceConfiguration.AllowedDeviceAccess)
{

}


The reason for the duplicate if is that I need to be sure my sure clicked on the yes button after showing the dialogbox. If I would use an else statement the user would have to click on the start button again and if I would use no if and the user would click on the “No” button an exception will be thrown when starting the CaptureSource without permission.


The following code needs to be placed inside the last curly braces of the previously added code:


System.Windows.Media.VideoCaptureDevice videodev; 
videodev
= CaptureDeviceConfiguration.GetDefaultVideoCaptureDevice();
if (videodev != null)
{
_cs.VideoCaptureDevice
= videodev;

VideoBrush vb
= new VideoBrush();
vb.SetSource(_cs);
_cs.Start();

grid1.Background
= vb;
myButton.Content
= "Stop webcam";
}


As you can see from the fifth line of the code above, the CaptureSource (_cs) needs a VideoCaptureDevice to start the capturing. We can create a VideoCaptureDevice and get the default one by using the GetDefaultVideoCaptureDevice.


We need to be sure there is a default capture device otherwise the app would crash and burn again when starting the CaptureSource.


In the two lines of code that follow the VideoCaptureDevice setting we created a VideoBrush and set the source to the CaptureSource. After this, most of the work is done and all we need to do now is start the capturing, set the background of my Grid to the VideoBrush and change the content of the button to “Stop webcam”.


In the final piece of code, which goes right after the if in the previous piece of code, we’ll create the functionality to stop the capturing and return to the state where we can start the capturing all over again:


else 
{
if (_cs.State == CaptureState.Started)
{
_cs.Stop();
myButton.Content
= "Start webcam";
}
}


You can find the source of the application here


Cheers!


Rob

Monday, November 2, 2009

Silverlight & Expression Usergroup in the Netherlands

I'm pretty proud to announce that Silverlight & Expression Insiders, the first Silverlight & Expression user group in the Netherlands, is starting it's activities.

Together with a number of other enthousiastic professionals we created a website. In the near future we will start more activities like organizing events and publishing articles.

If you want us to keep you posted, register on the homepage of the new website:
http://sixin.nl


Cheers!

Rob

Sunday, July 12, 2009

TextBox with automatically resizing of the fontsize

View the demo 

Download the source


A while back I ran into this textbox that automatically made the font smaller when the text was larger than the size of the textbox.

I wanted to recreate one in Silverlight.


The textbox had to have a property for the minimum size of the font. We don’t want our users to see a textbox with a font of 0.25 pixels. That wouldn’t be a good user experience :)

The rest of the stuff has to go pretty much automatically. When the user types, the fontsize automatically adjust. It gets smaller when the text is getting larger than the available space in the textbox and the fontsize gets larger when there’s enough available space.


Create a control

In Visual Studio, add a class and make it inherit the default TextBox:

public class TextBoxAutoResizingText : TextBox 

I am going to use a TextBlock to get the width of the text so that we can compare it to the ActualWidth property of the TextBox. If anyone has a different suggestion of how to achieve this, please let me know!

First of all, we need to create a field to keep the value of the original FontSize in. We create this field as a nullable double so we can check if it’s set, and only set it once:

private readonly TextBlock _textBlock = new TextBlock();  
private double? _originalFontSize;

Besides these private fields we have a few properties we can use to set the values of the: MinFontSize, Offset and Step. The Offset is required to prevent the text from dissapearing on the left side of the TextBox. The Step property is used as the amount in which the font needs to be scaled up or down. By default this is set to .25:

private double _minFontSize = 7;
public double MinFontSize
{
     get { return _minFontSize; }
     set { _minFontSize = value; }
}
private double _step = .25;
public double Step
{
     get { return _step; }
     set { _step = value; }
}
private double _offset = 12;
public double Offset
{
     get { return _offset; }
     set { _offset = value; }
}

Hooking up the events

We have a couple of events we’re going to use for this control. First of all we’re using the LayoutUpdated event to retrieve the original value of the fontsize and create our TextBlock so that it has almost the same properties as the TextBox.

In the constructor, we hook up the two events we’re using. That leaves us with the following code:

public TextBoxAutoResizingText()
{
     TextChanged += TextBoxAutoResizingTextTextChanged;
     LayoutUpdated += TextBoxAutoResizingTextLayoutUpdated;
}
private void TextBoxAutoResizingTextLayoutUpdated(object sender, EventArgs e)
{
     _textBlock.FontFamily = FontFamily;
     _textBlock.FontSize = FontSize;
     _textBlock.Padding = Padding;
     if(_originalFontSize == null)
     {
         _originalFontSize = FontSize;
     }
}

As you can see, we check if the _originalFontSize is set so it won’t be set every time the event is triggered.


The TextChanged event

This is the event where the actual work is done.
We can separate the event in two parts, one piece occurs when the text is larger than the available space in the TextBox and the other part when text is smaller than the available space:

private void TextBoxAutoResizingTextTextChanged(object sender, TextChangedEventArgs e)
{
     _textBlock.Text = Text;
     if (_textBlock.ActualWidth > ActualWidth - BorderThickness.Left - BorderThickness.Right - _offset)
     {
         while (_textBlock.ActualWidth > ActualWidth - BorderThickness.Left - BorderThickness.Right - _offset && FontSize > MinFontSize)
         {
             if (FontSize - _step <= MinFontSize)
                 break;
             FontSize -= _step;
             _textBlock.FontSize = FontSize;
         }
     }
     else
     {
         while (_textBlock.ActualWidth < ActualWidth - BorderThickness.Left - BorderThickness.Right - _offset && FontSize < _originalFontSize)
         {
             if (FontSize + _step <= MinFontSize)
                 break;
             FontSize += _step;
             _textBlock.FontSize = FontSize;
         }
     }
}

And that’s all there is to it. Pretty simple solution, but it can enhance the user experience without much effort.


This control can also be used from within Expression Blend. Because we used properties for the MinFontSize, it is easily adjustable in the Blend toolbox “Miscellaneous”.

View the demo 

Download the source

Thursday, April 23, 2009

Open in Expression Blend - switch between 2 and 3

Since Silverlight 3 is available, Blend 3 Preview was also released. When installing Silverlight 3 tools it is no longer available to create Silverlight 2 applications. Thanks to Amy Dullard who created an awesome batch file/deinstaller/installer script it makes life a lot easier.

The only thing that was bugging me was Expression Blend 2 and 3. Although the Silverlight 2 tools are installed, once installed, Blend 3 is the preferred application when using the "Open in Expression Blend" option in the context menu in VS2008.
After some searching in the registry I found out that it was the following key that did the mapping:
[HKEY_LOCAL_MACHINE\SOFTWARE\Wow6432Node\Microsoft\Expression\Blend\VS]

I created 2 registry files, 1 for going from Blend 2 to Blend 3 and one for going from Blend 3 back to Blend 2. It doesn't install/uninstall anything, it just changes the value in the registry.

So after I created the registry files and copied them to the folder of the batch file that Amy created, I added the following command(s) to the corresponding batch files:
reg import Blend3-to-2.reg
reg import Blend2-to-3.reg

Now, when switching between Silverlight 2 and 3 the "Open in Expression Blend" option also switches to Blend 2 for Silverlight 2 and Blend 3 Preview to Silverlight 3.

NOTE: I created this and only tested it on a 64 bit machine. I did include x86 version of the registry keys but these are untested!

Sometimes being lazy is a good thing, right? :)

Download the registry key files

Sunday, March 29, 2009

Automatically translate your Silverlight Application

Get the source now (58Kb)

UPDATE: Thanks to my colleague Emile van Ewijk who pointed out the the is keyword in C# does the same as the extension method that was used, I could refactor and optimize the code. So the source is updated. Thanks, Emile! (and shame on me for not knowing that...)


Let me start by saying that I’m no great fan of automatic translations. I rarely come across an automatically translated text that makes sense :)

As most of you know, I’m Dutch. That’s why my English sux ;). When I was at MIX09, where I met all of these great people, I also received a flyer in my goodie bag of Microsoft Live Translator. Since we, at Amercom, work for some international clients and create multilingual sites this attracted my attention.

And since everyone seems to be blogging on the new features of Silverlight 3B1 I figured, why not do it in plain old Silverlight 2 :P

Preparing your website for multilanguage in Silverlight

First thing I noticed when working with the Cultures in Silverlight (which most of you probably already know) was that the culture did NOT respond to the language settings of the browser. After some research I came across an article on MSDN library that said:

“The .NET Framework for Silverlight provides data for the invariant culture, but it retrieves information about all other cultures from the operating system. This means that the information that is available to a specific culture may differ across operating systems or even across versions of the same operating system.”

IMHO it is a mistake not to read the browser settings by default, but using the OS settings. There must be a pretty good reason for this, but I can’t think of it.

Anyway, to make sure your Silverlight 2 application responds to the settings of the browser, 2 configuration steps are necessary:

1. If you’re using an ASP.NET website/web application, set the following tag in the system.web section of the web.config:


2. Set the following parameters in the object tag of the silverlight control in the ASPX page (ASPX is needed for this functionality):

<param value="<%=System.Threading.Thread.CurrentThread.CurrentCulture.Name %>" name="Culture" />
<param value="<%=System.Threading.Thread.CurrentThread.CurrentUICulture.Name %>" name="UICulture" />


Once you’ve done that, you’ll be able to use the System.Globalization.CultureInfo.CurrentCulture and System.Globalization.CultureInfo.CurrentUICulture properties to retrieve the language set in the browser’s language settings.


What I wanted to achieve with my application is that I wanted to do nothing more then call a single method which takes a Panel control and goes through the children. It should be able to identify the type of control and should check the content for strings that can be translated. One thing that is not working in the sample application is controls that are contained in other controls than those that are derived of a Panel. So controls added to a Button.Content won’t be translated, but I doubt it will be difficult to add that functionality as well.


Adding the Live Translator


To add the Live translator to our application we only need to add a reference to the webservice they created. However, to use the webservice you also need to request an App_Id. You can create an app_id on the following website: http://search.live.com/developers/appids.aspx


On the previously mentioned site there is also more information available on the Live Translator service (API documentation, etc.). I created a constant which contains my app_id so I can easily reuse it through my entire class.

For the webservice, app_id and the source language I created the following fields/const:

private readonly LanguageServiceClient _languageServiceClient = new LanguageServiceClient();
private const string APP_ID = "7BAAE0482B3EA27295D38DA669A42E0F57B56B57";
private const string SOURCE_LANGUAGE = "en";


NOTE: the SOURCE_LANGUAGE should contain the TwoLetterISOLanguageName of the culture you want to use as the source for the translation. I chose English which means that all of the text I use in my Application should be added as English text. Translator should, in some cases be able to detect the language, but since we’re using single words in our application like “Upload” or “Download” I won’t rely on the automatic detection.


In my Page constructor I created a few basic Eventhandlers and a call to the translate method we will create in a moment:

_languageServiceClient.TranslateCompleted += _languageServiceClient_TranslateCompleted;
if(System.Globalization.CultureInfo.CurrentCulture.TwoLetterISOLanguageName != SOURCE_LANGUAGE)
{
DoTranslateElements(TranslateGrid);
}
ReTranslate.Click += ReTranslate_Click;


Create the DoTranslateElements method


We can use: if (element is TextBox) to check if the element is a TextBox or derived from the type.


Now for the DoTranslateElements method, the most imprtant thing that is done here is the following:

foreach (var element in parent.Children)
{
//contentcontrol elements (button, etc)
if (element is ContentControl)
{
ContentControl contentControl = element as ContentControl;
if (contentControl != null)
if (contentControl.Content is string)
{
_languageServiceClient.TranslateAsync(
APP_ID,
contentControl.Content.ToString(),
SOURCE_LANGUAGE,
System.Globalization.CultureInfo.CurrentCulture.TwoLetterISOLanguageName,
contentControl);
}
}

//elements which contain children
if (element is Panel)
{
//recursive call
DoTranslateElements(element as Panel);
}

if (element is TextBlock)
{
TextBlock textBlock = element as TextBlock;
if (textBlock != null)
_languageServiceClient.TranslateAsync(
APP_ID,
textBlock.Text,
SOURCE_LANGUAGE,
System.Globalization.CultureInfo.CurrentCulture.TwoLetterISOLanguageName,
textBlock);
}

if (element is TextBox)
{
TextBox textBox = element as TextBox;
if (textBox != null)
_languageServiceClient.TranslateAsync(
APP_ID,
textBox.Text,
SOURCE_LANGUAGE,
System.Globalization.CultureInfo.CurrentCulture.TwoLetterISOLanguageName,
textBox);
}
}


What is actually done here is loop through all of the elements in a Panel and:


1. If the element is a button, check if content is a string, than translate 2. If the element is a textblock or textbox, translate the text property value 3. If the element is a Panel, call the method itself again (recursive call)


What needs to be noticed is that I use the UserState property to send the object that is translated (button, textblock, etc) to the webservice. This object is returned in the TranslateCompleted event as you will see in the next section.


That is basically it. Now all of the (async) calls to the webservice are made and we only have to catch the TranslateCompleted event and set the correct content in the correct control property.


The TranslateCompleted event


In this event we need to retrieve the data which is returned from the webservice and set it in the corresponding property.

var element = e.UserState;
if (element is ContentControl)
{
ContentControl contentControl = e.UserState as ContentControl;
if (contentControl != null)
{
contentControl.Content = e.Result;
}
}

if (element is TextBlock)
{
TextBlock textBlock = e.UserState as TextBlock;
if (textBlock != null)
{
textBlock.Text = e.Result;
}
}

if (element is TextBox)
{
TextBox textBox = e.UserState as TextBox;
if (textBox != null)
{
textBox.Text = e.Result;
}
}


That's it! Now we get an automatically translated version of our application. I created a couple of buttons and a textblock - and box to test it. I also nested a few controls in a Grid and a Canvas which also worked fine. I have no more space on my personal site, so I can't get a demo online right now, but the source is available: Get the source now (58Kb) Hope this helps!

Friday, March 20, 2009

Dag 2 op MIX09

De 2e dag op MIX begint met een, voor ons, wat minder interessante keynote. De eerste helft is prima, daar wordt namelijk de nieuwste versie van Internet Explorer officieel gereleased (versie 8).

Het 2e gedeelte is een keynote van Deborah Adler. Zij is een designer die, nadat haar oma bijna overleed door het nemen van verkeerde medicijnen (die van haar man), een verbeteringsslag heeft gemaakt voor medicijnlabels en verpakkingen zodat de informatie over de medicatie eenvoudiger en duidelijker wordt. Op zich wel interessant, maar het had niets met internet te maken. Wel een erg mooi verhaal want haar ideeën zijn opgepikt door Target en zij hebben haar geholpen het product te verfijnen en hebben het daadwerkelijk op de markt gebracht.

Verder hebben we sessies gezien van Blend 3, ASP.NET vs MVC framework en The Best Video and Photography on the Web in Silverlight. De 2e sessie was minder interessant dan de andere 2. Maar in die periode waren er niet veel andere interessante sessies, dus de keuze was wat beperkt.

Tussen de middag hebben we gelunched met Martin Tirion en een collega van hem van Microsoft. Ik liep vandaag nog een aantal andere mensen tegen het lijf: Page Brooks van o.a. SilverlightContrib, Koen Zwikstra, Dave Campbell.


‘s Avonds de party @ Lavo gehad. De party zelf was niet echt een succes, maar we hebben wel de hele avond leuk en constructief kunnen spreken met Martin Tirion van Microsoft. Al met al dus weer een geslaagde dag geworden.

De laatste dag, dag 3 beloofd weer een aantal leuke sessies. Na de sessies gaan we waarschijnlijk lekker bij het zwembad zitten, want het weer is vrijdag nog goed. Vrijdagavond gaan we waarschijnlijk naar Freemont street, zaterdag is het weer wat minder dus dan gaan we de stad in.

Thursday, March 19, 2009

Dag 1 op MIX09

Dag 1 was erg verassend, interessant en erg gezellig.

We hebben bij de keynote een aantal aankondigingen gehoord, waaronder Silverlight 3 beta 1 wat wel de verwachting was.
Andere releases die gisteren plaatsvonden zijn:

Commerce Server 2009

Expression Blend 3 preview

Superpreview


SuperPreview

Superpreview is een applicatie die in de nieuwe versie (3) van Expression Web zit. Het is ook een losse applicatie, dus Expression Web is niet nodig om deze tool te gebruiken. De tool kan worden gebruikt om geknipte HTML in meerdere browser te testen. Hierbij kun je vensters waarin de schermen worden weergegeven als bijvoorbeeld IE6 en FF3 over elkaar heenleggen (semi transparant) zodat je makkelijk de verschillen kunt zien.

Het lijkt op het eerste gezicht een erg mooi hulpmiddel om de HTML in diverse browser er hetzelfde uit te laten zien. Zelfs testen van browsers op de MAC is hiermee mogelijk doordat er gebruik wordt gemaakt van servers op het internet. Hoe dit exact werkt weten we nog niet, maar we hebben de tool meegekregen op een memorystick, dus thuis kunnen we het uitproberen.

De versie die nu is gereleased geeft alleen nog de mogelijkheid voor IE 6 t/m 8. De andere browsers en platformen zullen snel volgen.

Expression Blend 3 preview

Waar ik zeer verrast door was, was de nieuwe features in Expression Blend. Ze hebben een mogelijkheid toegevoegd om te sketchen in Blend en om een flow op te zetten van je applicatie waardoor je in no-time een prototype kunt bouwen die eruit ziet als een geschetste applicatie. Maar met clickable buttons en animaties. Erg krachtig, dus ook daar moeten we goed induiken. Helaas hoorde ik net (donderdag, de 2e dag) bij een andere sessie dat de sketch functionaliteit nog niet in deze preview zitten. Da’s wel een teleurstelling.

Daarnaast is er een enorme verbetering gemaakt voor de Photoshop/Illustrator workflow met Expression Blend. Het is mogelijk om direct in Blend Photoshop files te importeren waarbij vectoren die gemaakt zijn in Photoshop bewaard blijven zodat deze nog te wijzigen zijn in Blend. Alle lagen, inclusief effecten (masks, etc) worden 1 op 1 overgenomen. Zelf fonts en alle fontsettings zoals line-height, etc. worden overgenomen in Blend.


Silverlight 3 beta 1

Weinig verrassingen voor wat mij betreft, op 1 na. Met Silverlight 3 wordt het mogelijk om de applicaties uit de browser te halen en offline te gebruiken. Dat geeft hele mooie mogelijkheden vooral omdat er geen los framework voor nodig is, zoals wel bij bijvoorbeeld Adobe Air het geval is. Ook de offline applicatie zit in de nieuwe plug-in.

Verder zijn toegevoegd:

  • 3D support (basis, alleen plaatsen in 3D space)
  • Pixel plaatsen
  • Genereren van Bitmaps van je objecten
  • Bitmap Shaders (dropshadow en blur worden meegeleverd, verder moeten we ze zelf schrijven)
  • Support voor chroma key (dus geen alpha channel, maar een aardig alternatief)

Commerce Server 2009

Helaas hebben ze hier niets van laten zien, maar daar kan ik me iets bij voorstellen. Commerce Server, tenminste de voorgaande versie was niet voorzien van een front-end voor zover ik begreep, dus dat is wellicht bij deze versie hetzelfde.


Even een kort videootje genomen van net buiten de Venetian.

Wednesday, February 4, 2009

Creating a ColorFillToy in Silverlight – part 3

Click here to go to part 1 of the series
Click here to go to part 2 of the series

Click here to download the source
Click here to view a demo


Allright, now we’re finally going to finish the colorfilltoy by adding the ColorPicker found in the SilverlightContrib library.

To embed the ColorPicker in our application, the easy way would be to just throw it on our LayoutRoot. This would result in a large control which would cover a part of our drawing so this is not desirable. Terence used a ColorPickerButton thingy in his example so since there is no such control available in Silverlight 2 I guess we have to create one ourselves. We already created the button in XAML in part 1 of this series, so now we’ll make it work.

We also already created the button as a Control in the first part of the series, so let’s start by coding the Button control.

What we basically want to achieve is that, by pressing the ColorPickerButton the ColorPicker Control will collapse below the button. The ColorPicker control however, is a much bigger control than the button. So if the button is positioned along the right or left border of the hosting application, the ColorPicker will appear off screen.
I want the control to align on the right or the left side of the button depending on the position of the button and the space available.
To accomplish that we have to check the LayoutRoot element of the application and use that to do our measurements. Since we already have that object in our application, we will add the ColorPicker to that as well.

Get the LayoutRoot element of the Application

Once we have the LayoutRoot we’ll save it in a private field. We also need an instance of the ColorPicker control from the SilverlightContrib library.

In the loaded eventhandler we are going to check if the LayoutRoot of the application is actually a Grid or a Canvas. If it’s not, we cannot calculate where the ColorPicker control needs to be positioned. We’ll throw an exception if it’s not.

All this put together creates something like this:

private Panel __parentPanel;
private SilverlightContrib.Controls.ColorPicker _colorPicker = new SilverlightContrib.Controls.ColorPicker();

///
/// ColorPickerButton control to leverage the ColorPicker control
///

public ColorPickerButton()
{
// Required to initialize variables
InitializeComponent();

this.Loaded += ColorPickerButton_Loaded;
}

private void ColorPickerButton_Loaded(object sender, RoutedEventArgs e)
{
_parentPanel = this.Parent as Panel;
if(_parentPanel == null)
{
throw new Exception("Parent control should be a control derived from FrameworkElement. Examples: Grid, Canvas");
}
LayoutRoot.Children.Add(_colorPicker);
}


The SelectedColor Property


Since we’re using the ColorPickerButton control to show and hide the ColorPicker control we need some way to persist the value of the selectedcolor that is set in the ColorPicker control.

We’ll create a similar DependencyProperty for the ColorPickerButton like there is for the ColorPicker Control itself:


/// 
/// Event fired when a color is selected.
///

public event SilverlightContrib.Controls.ColorPicker.ColorSelectedHandler ColorSelected;
#region SelectedColor DependencyProperty
///
/// Gets or sets the currently selected color in the Color Picker.
///

public Color SelectedColor
{
get { return (Color)GetValue(SelectedColorProperty); }
set
{
SetValue(SelectedColorProperty, value);
}
}

///
/// SelectedColor Dependency Property.
///

public static readonly DependencyProperty SelectedColorProperty =
DependencyProperty.Register(
"SelectedColor",
typeof(Color),
typeof(ColorPickerButton),
new PropertyMetadata(new PropertyChangedCallback(SelectedColorChanged)));

private static void SelectedColorChanged(DependencyObject d, DependencyPropertyChangedEventArgs e)
{
ColorPickerButton p = d as ColorPickerButton;
if (p != null && p.ColorSelected != null)
{
p.ColorSelected((Color)e.NewValue);
}
}
#endregion

Handling clicks


To finish up the control we need to handle the clicks on the ColorPickerButton. We want to prevent the ColorPicker control to disappear every time it is clicked. This time we’ll do it by handling the click on the LayoutRoot object and check if our control is hit by using the VisualTreeHelper and LINQ to query the results:


private void LayoutRoot_MouseLeftButtonUp(object sender, MouseButtonEventArgs e)
{
IEnumerable uiElements = VisualTreeHelper.FindElementsInHostCoordinates(e.GetPosition(null), LayoutRoot);
var elements = from elem in uiElements
where elem == this.ColorPickerButtonCanvas
select elem;

if (elements.Count() == 0)
return;

_colorPicker.Visibility = _colorPicker.Visibility ==
Visibility.Collapsed ? Visibility.Visible : Visibility.Collapsed;
}

Positioning the ColorPicker control


To position the control we’ll use the LayoutUpdated event of the ColorPickerButton. Note: I created the method only for left/right positioning calculations, not for the bottom/top one, I also only tested it in a Canvas control but it should work in a Grid as well:


private void ColorPickerButton_LayoutUpdated(object sender, EventArgs e)
{
double leftPos = 0;
double topPos = 0;
double leftPosInParent = 0;

_colorPicker.MinWidth = 200;
_colorPicker.MinHeight = 200;
if (_parentPanel != null)
{
if (_parentPanel.GetType() == typeof(Canvas))
{
leftPosInParent = Canvas.GetLeft(this);
}
if (_parentPanel.GetType() == typeof(Grid))
{
leftPosInParent = this.Margin.Left;
}
}

topPos = ColorPickerButtonCanvas.ActualHeight;

double maxWidth = double.Parse(App.Current.RootVisual.GetValue(FrameworkElement.WidthProperty).ToString());
if (leftPosInParent + _colorPicker.Width > maxWidth)
{
//align right
leftPos = -_colorPicker.Width + this.ActualWidth;
}
else
{
//small offset for the slider
topPos += 5;
}

Canvas.SetLeft(_colorPicker, leftPos);
Canvas.SetTop(_colorPicker, topPos);
}

With this code it makes it possible to position the button on the right or left side of any control and it will automatically switch to right or left alignment:


screenshot


Final adjustments


Now to use the color that was selected in the ColorPicker we need to remove the random color stuff we have now and replace it with a single line of code:


Color color = myColorPickerButton.SelectedColor;

Hope this helps!


Click here to download the source

Click here to view a demo

Wednesday, January 28, 2009

Creating a ColorFillToy in Silverlight - Part 2

Click here to view a demo of the application after part 2 of the tutorial/
Click here to download the source

In part 1 of this tutorial we focused on the creation of the XAML for the ColorFillToy application. In this part, we will create the code to set the cursor and to detect the FillArea that we need to fill.

Terence Tsang from shinedraw.com did the preparation for us, so we're going to reuse some of his code from his flash-vs-silverlight post on the ColorFillToy.

I'm also going to use the ColorPicker from the SilverlightContrib project. So we'll need a reference in our project for that.
As a little extra I'm going to create a ColorPickerButton control which triggers the ColorPicker and shows the selected color. Page Brooks was pretty excited about this and we're probably going to include it in the SilverlightContrib project as an addition to the ColorPicker control. I'll get around to this in the next and final part of this serie.

Finalizing the XAML

First of all we're going to finish up our XAML in Expression Blend by creating a ColorPickerButtonControl and creating an image which we'll use as our cursor. There is no bucket cursor available in Silverlight so we'll have to create one ourselves.

Using Expression Blend we can create a button looking a lot like the one Terence used in his Flash example.

First create the button on the LayoutRoot of the ColorFillToy. It's just a bunch of rectangles and paths making it look like this:


The most important thing of this control is the Rectangle (second object in our Canvas) named ButtonBackground. ButtonBackground is used to "fill" the button with the currently selected color of the ColorPicker.

Once we're pleased with the looks of the ColorPickerButtonControl we can right-click the container Canvas and select "Make Control...".
Now Blend will do most of the work for us. Create the control, create the reference and and instance of the control where we had our container Canvas.

The new Control will open in a new window in Blend. Close it and return to the Page.xaml.

Now lets not forget to add an image to the LayoutRoot canvas of 16x16 and select the paintbucket image. I placed the image right outside of the canvas so it won't be visible if the application loads.


This rounds up the design part.
Right-click the Page.xaml in Expression Blend and select "Edit in Visual Studio" to continue in VS2008.
Like I said earlier, we're going to use most of the code Terence created for us. You can download his code here: http://www.shinedraw.com/?dl_id=113

Making it work

Most of the important stuff is done in the RootVisual_MouseLeftButtonDown handler:

void RootVisual_MouseLeftButtonDown(object sender, MouseButtonEventArgs e)
{
// generate random color
Random r = new Random();
byte red = (byte)(255 * r.NextDouble());
byte green = (byte)(255 * r.NextDouble());
byte blue = (byte)(255 * r.NextDouble());
Color color = Color.FromArgb(255, red, green, blue);

// get the ui
Border border = sender as Border;
Canvas canvas = (Canvas)border.Child;

// create ellipse
Ellipse ellipse = new Ellipse() { Fill = new SolidColorBrush(color), Width = DEFAULT_SIZE, Height = DEFAULT_SIZE };
ellipse.SetValue(Canvas.LeftProperty, e.GetPosition(canvas).X);
ellipse.SetValue(Canvas.TopProperty, e.GetPosition(canvas).Y);

// add to stage
canvas.Children.Add(ellipse);
ScaleTransform scale = new ScaleTransform() { CenterX = DEFAULT_SIZE / 2, CenterY = DEFAULT_SIZE / 2 };
ellipse.RenderTransform = scale;

// expand the ellipse
DoubleAnimation doubleAnimatoin1 = new DoubleAnimation() { From = 1, To = SCALE_MAX };
doubleAnimatoin1.Duration = new Duration(new TimeSpan(0, 0, 3));
Storyboard.SetTarget(doubleAnimatoin1, scale);
Storyboard.SetTargetProperty(doubleAnimatoin1, new PropertyPath("(ScaleX)"));

DoubleAnimation doubleAnimatoin2 = new DoubleAnimation() { From = 1, To = SCALE_MAX };
doubleAnimatoin2.Duration = new Duration(new TimeSpan(0, 0, 3));
Storyboard.SetTarget(doubleAnimatoin2, scale);
Storyboard.SetTargetProperty(doubleAnimatoin2, new PropertyPath("(ScaleY)"));

// start the story board
Storyboard storyboard = new Storyboard();
storyboard.Children.Add(doubleAnimatoin1);
storyboard.Children.Add(doubleAnimatoin2);
storyboard.Begin();
}


All that is actually done in this code is the following:
- Generate a random color
- Get the border object that is clicked on
- Create an Ellipse and add it to the Canvas located inside the Border
- Use a Storyboard to expand the Ellipse

So most of this stuff is reusable. We're going to make the following changes to this code to make it work in our application:
- Instead of Border objects we're going to use a method to find the fillarea that was clicked on.
- The cursor paintbucket needs to be added when hovering over ColorFillToy.
- We need to finish up our ColorPickerButtonControl to expand the ColorPickerControl when it's clicked and set the background of the button to the selected color. This selectedcolor is used to fill the Ellipse instead of the randomized color

Finding the FillArea


To locate the parent FillArea, we have are going to use the MouseLeftButtonDown event of the FillArea Canvas or of the objects on the FillArea Canvas.
We can use a recursive method to go through the collection of user controls from top to bottom. The first FillArea we encounter will be the parent FillArea of the clicked object.
I created an extension method for the FrameWorkElement controls:

public static Panel FindFillArea(this FrameworkElement originalSource)
{
if (originalSource == null) throw new ArgumentNullException("originalSource");
if (originalSource.Name.IndexOf("fillarea") == 0 || originalSource == Application.Current.RootVisual)
return (Panel)originalSource;

FrameworkElement parent = (FrameworkElement)originalSource.Parent;
if (parent != null)
{
if (parent.Name.IndexOf("fillarea") == 0 || parent == Application.Current.RootVisual)
{
return (Panel)parent;
}
return FindFillArea(parent);
}

return (Panel)Application.Current.RootVisual;
}


We can use this extensionmethod in the MouseLeftButtonDownHandler.
Instead of the line:
Canvas canvas = (Canvas)border.Child;

We can use:
Panel panel = originalSource.FindFillArea();


Adding the paintbucket cursor


The add the paintbucket cursor add the following lines to the Loaded event of the control:

LayoutRoot.MouseMove += ColorFillToy_MouseMove;
cursor.IsHitTestVisible = false;
cursor.Visibility = Visibility.Collapsed;

And add the following MouseMove handler:

private void ColorFillToy_MouseMove(object sender, MouseEventArgs e)
{
cursor.Visibility = Visibility.Visible;
this.Cursor = Cursors.None;
Canvas.SetLeft(cursor, e.GetPosition(null).X - 10);
Canvas.SetTop(cursor, e.GetPosition(null).Y - 10);
}


By doing this the image will replace the normal cursor and it will appear to be a real cursor.

In this part we finished up the XAML, created an extension method to find the fillarea we need and filled the area with a random color.
In the next and final part we'll add the ColorPickerButton and the ColorPicker of the SilverlightContrib project and make sure we can pick any color we like.

Click here to view a demo of the application after part 2 of the tutorial/

Click here to download the source

Cheers!

Rob.

Sunday, January 25, 2009

Creating a ColorFillToy in Silverlight - Part 1

Hi,

It's been a while since my last blogpost. It's been a bit of a hectic period lately.

But not blogging doesn't mean not doing anything :) I've been working on some stuff which I'll blog about in the coming period. Like a deepzoom application for my aunt which enables her to show the bronze sculpture work she does in detail.

But for now, I want to tell you something about the ColorFillToy I (re)created. Thanks Terence for the challenge :) (http://www.shinedraw.com/animation-effect/flash-vs-silverlight-colour-fill-toy/).

Terence of Shinedraw.com created a colorfilltoy in Flash and mentioned he didn't have enough knowledge on Expression Design to create a similar application in Silverlight.
I can say the same, I haven't worked with Design much, but I tried to recreate the application using Blend.

To achieve the shape I wanted, I created three circles. One large one and 2 smaller ones which I placed inside the larger one:


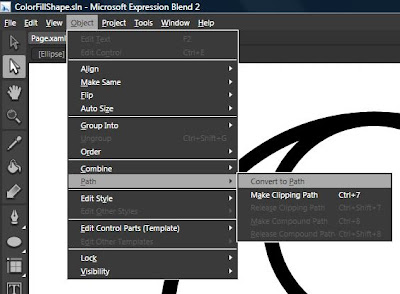
Now we need to remove the left half of the top circle and the right half of the bottom one. This is only possible if we convert the ellipse to a path object. You can achieve this by right clicking the object, choose the Path section and the Convert to Path option or by selecting the circles and choose the same option from the Object menu:


Now, by using the Direct selection tool (Shortcut key A in Blend) you can select parts of the ellipse which is now a path:


As said before, now delete the left part of the top circle and the right part of the bottom circle (or vice versa).
The shape you're getting now is exactly what you want.

Now, to create the fill ability I used wanted to use a clipping path so I need both of the shapes separately (the 2 halves of the yin-yang sign).

Next I converted the large circle to a path as well and copied it, and all of the other path's I created so far. We need to create 2 separate shapes, so the large circles need to be split up in 2 half circles. One left and one right side. You know the drill!

Visually there are no differences by making these changes, but you'll see next how these are really necessary to create the effect we need.
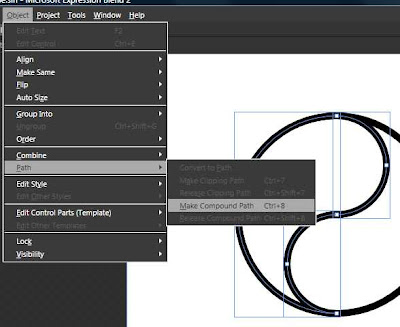
To glue the 3 shapes together (1 large half circle, and 2 smaller ones) we can use a compound path. Select the three paths, right-click and select Path, Make Compound Path:


Do the same with the other 3 shapes and we have our 2 halves of the yin-yang sign.
To make the filling effect possible we need to do 2 things:
1. Create a Canvas for the fill to be dropped on, make sure the Canvas has a fill, with the Alpha value of the fill set to 0% (not the opacity, but the alpha of the fill!)
2. Create a clipping path on the canvas to clip the ellipse if it gets any larger then the shape we had in mind.

To add the shape to a Canvas can easily be accomplished by right clicking the shape and selecting Group into, Canvas. Now a Canvas is created while the shape keeps its position and shape.
Creating a clipping path for this complex shape was a bit more difficult to achieve. At least the first time I tried :).

First, create a copy of the shape (the combined path). Now set the StrokeThickess to 0 in the Appearance section of the shape's Properties.
Next, by using the Direct selection tool make sure the shape surrounds the original shape:


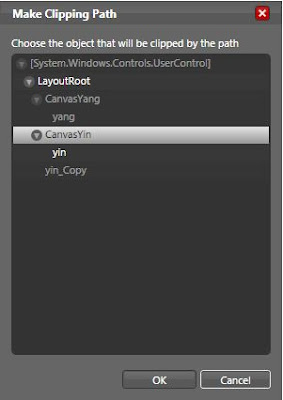
Finally the path is ready to be used as a clipping path. Right-click the path and select Path, Make Clipping Path. In the pop-up that appears select the correct Canvas (Yin or Yang):


Note: When you notice a thin white line in the border you can adjust the path using the Direct selection tool. I cannot seem to get it aligned 100% accurately, even at 6400% zoom:


After creating these complex shapes, it's a piece of cake to create the small circles and the rectangle fill areas.
The end result should look something like this:


When creating these fillareas make sure they are prefixed with "fillarea". We are going to use this later on.

In the next part of this tutorial we'll do the coding. We can reuse a lot of the code Terence already created for us in his simple Silverlight version.


Hope this helps!

Friday, January 2, 2009

MVP: Expression

This morning when I read my e-mail I noticed I had a message in my junk e-mail.
When I opened it, it said:


Dear Rob Houweling,

Congratulations! We are pleased to present you with the 2009 Microsoft® MVP Award! This award is given to exceptional technical community leaders who actively share their high quality, real world expertise with others.


As you can imagine I am very proud of this and hope to prove that I'm worthy :)