Monday, October 13, 2008

Clipboard support in Silverlight 2

* UPDATE *
The demo now works with Silverlight 2 RTW and the ClipboardHelper has been added to the source of the SilverlightContrib project. It'll be in the next release.

By default, there is no clipboard support in Silverlight 2. Page Brooks, who is the project coordinator of the open source project SilverlightContrib I'm working on with a bunch of other developers (I feel really honered to work with them...), wanted to add this to the SilverlightContrib project as well so I decided to start off with a basic implementation.

You can create (limited) clipboard support in Silverlight by using Javascript and HTML DOM to read from, add to and clear the clipboard. Note that this will only work in Internet Explorer.

I created a class in which the following methods do the most important work:


public void SetData(string Value)
{
_window.Eval(string.Format("window.clipboardData.setData('text','{0}')", Value));
}

public string GetData()
{
this._currentValue = (string)_window.Eval("window.clipboardData.getData('text')");
return _currentValue;
}

public void ClearData()
{
_window.Eval("window.clipboardData.clearData()");
}


In the constructor of the class I create the possibility to add multiple UIElements as a parameter:


public ClipboardHelper(params UIElement[] UIElementsToCatchEventsOf)
{
if (UIElementsToCatchEventsOf != null)
{
foreach (UIElement element in UIElementsToCatchEventsOf)
{
element.KeyDown += new KeyEventHandler(UIElement_KeyDown);
element.KeyUp += new KeyEventHandler(UIElement_KeyUp);
}
}
}


By subscribing to the KeyUp and KeyDown event of the specific UIElement you can also add paste support to the elements. For example the Button:

private void UIElement_KeyUp(object sender, KeyEventArgs e)
{
if(e.Key == Key.Ctrl)
_ctrlPressed = false;
if (e.Key == Key.V && _ctrlPressed)
{
this.GetData();
if (sender.GetType() == typeof(Button))
{
Button buttonSender = (Button)sender;
buttonSender.Content = this.GetData();
}
}
}


You could also create your own implementation for ListBox and other elements. Be aware though that this will only work with items that can gain focus.


Watch the demo here

Download the project here

Saturday, September 20, 2008

Sneak preview

Don't tell Jeff, but here's a preview of another one of the projects in Foundation Silverlight 2 Animation.

I made a little modification to this compared to the one that you'll create from the instructions in the book, assuming you're going to get it of course :).
To make the dragon move more "natural" I used a DispatcherTimer with a random duration to make it change direction at a random time.


Click here to view the WMV file


Visit designwithsilverlight.com for more previews of the projects in the book.

Thursday, August 21, 2008

Authentication in Silverlight using ASP.NET FormsAuthentication

On the Silverlight forum I've seen a lot of questions regarding authentication and security.
I figured I'd write something down from my perspective as an ASP.NET developer. This isn't the only way to do it and probably not the best, but it does what I need it to do and it might get you started in the right direction.

IMPORTANT NOTE: This article is built with the assumption that all files requested are handled by ASP.NET and not by IIS (so let .net dll handle the wildcard extension *).

Click here to download the source

1. How and why

ASP.NET provides excellent methods for securing web applications using WindowsAuthentication or FormsAuthentication. And creating your own MembershipProvider allows you to authenticate using any type of database or other data storage.
For this example I chose to use FormsAuthentication because this gives you lots of freedom and flexibility to expand or adjust in a later stage of the build of your project.

2. Securing the ASP.NET application

In this example we will secure the application and will test it using 2 types of request:
- a file which is in a secured folder on the server
- a WCF webservice secured method

I used a standard Silverlight Application Project template in Visual Studio with a Web Application project, not a Website. This will probably also work with the Website, but to prevent problems better use the WebApplication type.

2.1 Changes to the Web.Config

First of all we're going to configure the ASP.NET Web Application to use FormsAuthentication to secure a folder.
Create a folder named "Secure" in the root of the ASP.NET Web Application (website from here on).
Open the Web.Config and locate the following section:

Change it to this:


Second thing to do in the Web.Config is to add the following section just after the tag:


That's it. We're done securing the folder Secure in our website. To verify this, create an XML file in the Secure folder with the following content:


You can only see this if you're logged in.


Now run your website pressing F5 and try to open the XML file. If everything went as planned you should see the application redirected you to a login.aspx which doesn't exist. We won't create one in this tutorial because we'll be using Silverlight to do the logging in and not ASP.NET.

Next thing we're going to do is to create the WCF webservice that we'll use for logging in the website.

2.2 Create a WCF Authentication Service


We'll be using a standard Silverlight WCF Service for this. I always like to keep my application tidy so I created a folder in the root of my website named "WebServices".
In that folder, create a "Silverlight-enabled WCF Service" which you can find in the dialog that appears when you click on Add => New Item and when you select the Silverlight Category. Name the service "AuthenticationService".

In the created WCF service there is a method already created for you:
[OperationContract]
public void DoWork()
{
// Add your operation implementation here
return;
}

Replace this method with the following code:
[OperationContract]
public bool Authenticate(string Username, string Password)
{
if (FormsAuthentication.Authenticate(Username, Password))
{
FormsAuthentication.SetAuthCookie(Username, false);
return true;
}
return false;
}


As you can see is that all we did was create a method with a username and password parameter which uses the two default FormsAuthentication methods, Authenticate and SetAuthCookie, to enable security. The reason we need the SetAuthCookie is because it fills the
HttpContext.Current.User
object which we can read out later on to verify if a user is logged in and which user it is.

That covers the authentication part for now. Next, we'll create the Silverlight Application with the login form.

2.3 Creating the login form in Silverlight


Open the Page.xaml in Expression Blend. In the LayoutRoot, add three Grids:
- LoginForm
- ResultForm
- TestForm

Make sure the ResultForm is positioned at about the same position as the LoginForm and the the visibility of the ResultForm is set to Collapsed.

On the LoginForm, add the textblocks (labels), textboxes and a button needed to create login form so that it looks like this:
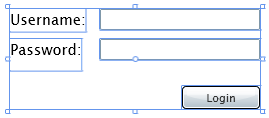


On the ResultForm, add a textblox with a default text of:
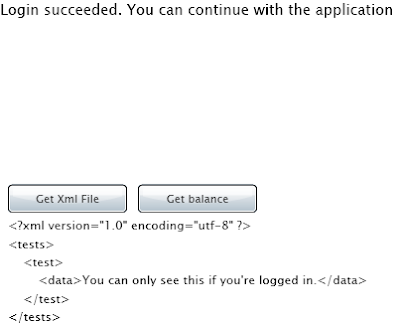
Login succeeded. You can continue with the application

On the TestForm, add 2 buttons and a large Textblock:
- ButtonGetMyBalance
- ButtonGetXmlFile
- TextBlockResult

When you're done you should have something similar to this:
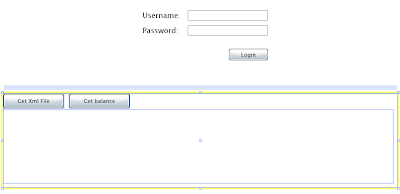

Now we're done with preparing the interface and we'll proceed to the coding of the application. Open the Page.xaml.cs with Visual Studio 2008.

2.4 Calling the AuthenticationService


Before calling the service, we need to add the reference to the service to the Silverlight Application.
Right-click on the Service Reference folder in the Silverlight Application project, and select "Add Service Reference".
Next, click on the "Discover" button that is in the pop-up window that will appear.
After the discovery is completed, you'll see the AuthenticationService appear in the box "Services".
Select it and change the "Namespace" to: "AuthenticationService". Now press OK and the service will be added to you project.
Now, let's continue in the Page.xaml.cs.

In the Page() constructor, add the following lines of code after the InitializeComponent() method:
ButtonLogin.Click += new RoutedEventHandler(ButtonLogin_Click);
ButtonGetXmlFile.Click += new RoutedEventHandler(ButtonGetXmlFile_Click);


Next, add the code for getting the Xml file using a WebClient:
void ButtonGetXmlFile_Click(object sender, RoutedEventArgs e)
{
WebClient webclient = new WebClient();
webclient.DownloadStringCompleted += new DownloadStringCompletedEventHandler(webclient_DownloadStringCompleted);
webclient.DownloadStringAsync(new Uri("../Secure/TestFile.xml", UriKind.Relative));
}

void webclient_DownloadStringCompleted(object sender, DownloadStringCompletedEventArgs e)
{
if (e.Error == null && !string.IsNullOrEmpty(e.Result))
{
TextBlockResult.Text = e.Result;
}
else
{
if (e.Error != null)
TextBlockResult.Text = e.Error.Message;
else
TextBlockResult.Text = "Please login first";
}
}


Now create the event handler for the ButtonLogin.Click event:
private void ButtonLogin_Click(object sender, RoutedEventArgs e)
{
AuthenticationService.AuthenticationServiceClient authService = new AuthenticationService.AuthenticationServiceClient();
authService.AuthenticateCompleted += new EventHandler(authService_AuthenticateCompleted);
authService.AuthenticateAsync(TextBoxUsername.Text, TextBoxPassword.Text);
}


As you can see in the previous code, we need to create an eventhandler for the AuthenticateCompleted event.

void authService_AuthenticateCompleted(object sender, SilverlightAuthentication.AuthenticationService.AuthenticateCompletedEventArgs e)
{
if (e.Result)
{
LoginForm.Visibility = Visibility.Collapsed;
ResultForm.Visibility = Visibility.Visible;
TextBlockResult.Text = "";
}
else
{
TextBlockResult.Text = "Unable to log you in. Invalid username or password.";
}
}


In this piece of code we hide the LoginForm once the authentication is succeeded. If authentication fails, an errormessage is displayed in the TextBlockResult control.

When you press F5 to run the application, you should be able to login using the credentials we added in the Web.Config:
username: myUser
password: secret

If you use an incorrect username, the errormessage should appear in the TextBlockResult.

You can also try to use the "Get Xml File" button which should only work if you're logged in.

2.5 Create a secure WCF Webservice


For the retrieval of your balance (don't worry, it's not your real balance) we are going to create another Silverlight-enabled WCF service. Let's call it "BalanceService". Next, we'll create the method "GetMyBalance" in there which will return a decimal and a boolean value.
Again, replace the default generated method with the following code:
[OperationContract]
public bool GetMyBalance(out decimal Balance)
{
if (HttpContext.Current.User.Identity.IsAuthenticated)
{
Balance = 1000.00M;

return true;
}
else
{
Balance = decimal.MinValue;
return false;
}
}


As you can see, we use the User.Identity object, which was filled using the SetAuthCookie method we called earlier on in this tutorial, to check if the user calling the method is authenticated. If the user is authenticated, the webservice will return true and will fill the Balance output paramater with the correct value, else it will return false and the decimal.MinValue in the Balance parameter.

Next well add the functionality to call the WCF Service in the Silverlight application.

2.6 Add functionality in Silverlight for the BalanceService


First we need to add the Service Reference to the project again. Since we've done this before, I'll just sum it up:
- Right-click the Service References folder
- Click on Add Service Reference
- Click on Discover
- Select the service "BalanceService"
- Change the namespace to "BalanceService"
- Click OK

Once we're done with that it's time to do some coding.

Add the following line to the Page() constructor, just before the closing curly brace:
ButtonGetMyBalance.Click += new RoutedEventHandler(ButtonGetMyBalance_Click);


Next, create the event handler for the Click event:
void ButtonGetMyBalance_Click(object sender, RoutedEventArgs e)
{
BalanceService.BalanceServiceClient balanceService = new SilverlightAuthentication.BalanceService.BalanceServiceClient();
balanceService.GetMyBalanceCompleted += new EventHandler(balanceService_GetMyBalanceCompleted);
balanceService.GetMyBalanceAsync();
}


What we see here is that it is not necessary to add the out parameter of our method to the webservice call. In the next step we'll see what happens with that.

All we need to do now is to create the handler for the GetMyBalanceCompleted event:
private void balanceService_GetMyBalanceCompleted(object sender, SilverlightAuthentication.BalanceService.GetMyBalanceCompletedEventArgs e)
{
if (e.Result == true)
{
TextBlockResult.Text = string.Format("Your balance: {0}", e.Balance.ToString());
}
else
{
TextBlockResult.Text = "Please login first";
}
}


What we see now is that our out parameter is included in the GetMyBalanceCompletedEventArgs. This way we can use multiple parameters without creating a class for this.

If you press F5 now, and try the button without logging in, you'll see the "Please login first" text in the resultbox.
After you're logged in and press the button the Balance will appear in the resultbox.



That's it for now. I hope this helps to get you started using this type of authentication.

Click here to download the source

Monday, August 18, 2008

Announcing Foundation Silverlight 2 Animation

Past weeks it's been a bit slow on my blog and I haven't been participating on the Silverlight.net forums as much as I would like to.
The reason for this is that I've been pretty busy on a big project.

Jeff Paries, author of multiple books on animation and now the author of "Foundation Silverlight 2 Animation", approached me to do the technical editing of the book and the (150) projects that are used in it. I am very grateful with the opportunity Jeff has offered me and I hope he's not dissapointed with his choice.

Being a technical editor involves reading the book very thorough and testing the code, helping to solve problems, refactor code, etc. With the 150 projects in the book you can imagine this is quite time consuming, but it's also very much fun.
Jeff has selected very interesting, appealing projects and writes in a way that captures your attention and doesn't let it go. So this makes my job a lot easier :)

Visit the website of Jeff Paries for the announcement

Preorder the book on Amazon

Tuesday, August 5, 2008

Silverlight SharpZipLib on CodePlex

Today I added the code for the ported version of the SharpZipLib for Silverlight to CodePlex.

If you want to download the DLL or the source go visit http://www.codeplex.com/slsharpziplib

Tuesday, July 22, 2008

PanoCube in Webdesigner Magazine


For the panocube project, created by Martijn Croezen and me, we teamed up again and wrote a tutorial for Webdesigner Magazine.

It's in store starting today, so get it while it's hot!

Monday, June 23, 2008

Creating a sketch application in Silverlight - Part 2, Saving the sketch on the server

In the second part of this tutorial we're going to pick up where we left off. So we can open the SketchApplicationPart1 solution from the first part of the tutorial (or you can download the source of the second part of this one at the end of this tutorial).
Now we're going to create a way to save the drawing to the server using SharpZipLib in Silverlight, to zip the XML file before sending it to a webservice.

1. Add Click eventhandler for the Save button


and a Helper class for creating the XML.
First we need an eventhandler for the Save button. This is added in the Page_Loaded event of the Page.xaml.cs:
SaveButton.Click += new RoutedEventHandler(SaveButton_Click);


In the Lib Folder, which I created, I add a class "XMLHelpers.cs".
This class only contains a single method to create the XML file. I used LINQ (both to objects and XML) to iterate through the StrokeCollection and create the XML. The class returns an XElement object.
Add the following method "CreateXElementsFromStrokeCollection" to the class:

public static XElement CreateXElementsFromStrokeCollection(StrokeCollection DrawingStrokeCollection)
{
var xmlElements =
new XElement("Strokes", DrawingStrokeCollection
.Select(stroke =>
new XElement("Stroke",
new XElement("Color",
new XAttribute("A", stroke.DrawingAttributes.Color.A),
new XAttribute("R", stroke.DrawingAttributes.Color.R),
new XAttribute("G", stroke.DrawingAttributes.Color.G),
new XAttribute("B", stroke.DrawingAttributes.Color.B)
),
new XElement("Points", stroke.StylusPoints
.Select(point =>
new XElement("Point",
new XAttribute("X", point.X),
new XAttribute("Y", point.Y),
new XAttribute("PressureFactor", point.PressureFactor)
)
)
),
new XElement("Width", stroke.DrawingAttributes.Width),
new XElement("Height", stroke.DrawingAttributes.Height)
)
)
);

return xmlElements;
}


This is an example of the xml the function returns:


13
13


13
13


Looks nice with a minimal amount of effort thanks to LINQ.
By the way, don't forget to add a reference to System.Xml.Linq and add both the using's for System.Linq and System.Xml.Linq.

2. Create a webservice in your WebAppication Project

Name it SaveDrawingService.asmx.
In this tutorial I used an ASMX webservice, but it's almost just as easy to implement a WCF service.
This webservice should contain 2 methods, one for saving a new drawing and one for saving a already saved drawing.
These methods are uncomplicated because all we have to do here is to save the byte[] that is sent from the Silverlight application to the server:

[WebMethod]
public Guid SaveNewDrawing(byte[] zippedFileBytes)
{
Guid drawingID = Guid.NewGuid();
DirectoryInfo drawingFolder = new DirectoryInfo(Server.MapPath("~/App_Data/Drawings/"));
if (!drawingFolder.Exists)
drawingFolder.Create();
FileInfo fi = new FileInfo(Server.MapPath("~/App_Data/Drawings/" + drawingID.ToString() + ".zip"));
if (fi.Exists)
fi.Delete();

FileStream fileStream = new FileStream(Server.MapPath("~/App_Data/Drawings/" + drawingID.ToString() + ".zip"), FileMode.OpenOrCreate);

fileStream.Write(zippedFileBytes, 0, zippedFileBytes.Length);
fileStream.Flush();
fileStream.Close();
return drawingID;
}

[WebMethod]
public bool SaveEditedDrawing(Guid DrawingID, byte[] zippedFileBytes)
{
FileInfo fi = new FileInfo(Server.MapPath("~/App_Data/Drawings/" + DrawingID.ToString() + ".zip"));
if (fi.Exists)
fi.Delete();

FileStream fileStream = new FileStream(Server.MapPath("~/App_Data/Drawings/" + DrawingID.ToString() + ".zip"), FileMode.OpenOrCreate);

fileStream.Write(zippedFileBytes, 0, zippedFileBytes.Length);
fileStream.Flush();
fileStream.Close();
return true;
}


3. Add a Service Reference to the ASMX webservice


Before doing this, always try if the ASMX webservice opens in the browser by right-clicking the asmx file of the webservice in VS2008 and clicking "View in browser".
If it opens correctly, it can be added to the Silverlight project using the namespace SaveDrawingService.

4. Add the SharpZipLib library to your Silverlight project


The version I rebuilt is added in the sourcecode, so you can add the project, or compile a DLL and reference that.

5. Implement the save functionality in Silverlight (zipping and sending)


First, add the System.IO and System.Text namespaces in the using section of the Page.xaml.cs. Next, create a private field "_currentDrawing" of type Guid to save the guid of the drawing (this is returned by the webservice).
Now, the following code needs to be used for the click event:
void SaveButton_Click(object sender, RoutedEventArgs e)
{
SaveDrawingService.SaveDrawingServiceSoapClient wsclient = new SaveDrawingService.SaveDrawingServiceSoapClient();

// A memory stream to write to
using (MemoryStream zippedMemoryStream = new MemoryStream())
{
// A ZIP stream
using (ZipOutputStream zipOutputStream = new ZipOutputStream(zippedMemoryStream))
{
// Highest compression rating
zipOutputStream.SetLevel(9);

byte[] buffer;

// The string to use as file content
using (MemoryStream file = new MemoryStream(Encoding.UTF8.GetBytes(Lib.XMLHelpers.CreateXElementsFromStrokeCollection(inkpresenter.Strokes).ToString())))
{
buffer = new byte[file.Length];
file.Read(buffer, 0, buffer.Length);
}

// Write the data to the ZIP file
ZipEntry entry = new ZipEntry("drawing.xml");
zipOutputStream.PutNextEntry(entry);
zipOutputStream.Write(buffer, 0, buffer.Length);

// Finish the ZIP file
zipOutputStream.Finish();
}
if (_currentDrawing == Guid.Empty)
{
wsclient.SaveNewDrawingCompleted += new EventHandler(wsclient_SaveNewDrawingCompleted);
wsclient.SaveNewDrawingAsync(zippedMemoryStream.ToArray());
}
else
{
wsclient.SaveEditedDrawingCompleted += new EventHandler(wsclient_SaveEditedDrawingCompleted);
wsclient.SaveEditedDrawingAsync(this._currentDrawing, zippedMemoryStream.ToArray());
}
}
}

void wsclient_SaveEditedDrawingCompleted(object sender, SaveDrawingService.SaveEditedDrawingCompletedEventArgs e)
{
//Add functionality to show user drawing is saved
}

void wsclient_SaveNewDrawingCompleted(object sender, SaveDrawingService.SaveNewDrawingCompletedEventArgs e)
{
this._currentDrawing = e.Result;
//Add functionality to show user drawing is saved
}


An explanation of what happens here: First, an instance of the WebserviceSoapClient is created. Next, a new memorystream is created for writing and a ZipOutputStream is created for zipping the "XML string" returned by the XElement which is returned by the CreateXElementsFromStrokeCollection method.
A zipentry "drawing.xml" is created for the actual drawing in the zipfile. The byte array created by the zippedMemoryStream.ToArray() is then sent asynchronously to the server.

I'll call it a day for now. If I get around to it, I'll create a third part to add some more functionality to the sketching application.

Click here for the source